WordPress SEO: Creating Robots.txt File. Using Meta Robots Tag. XML Sitemap
How to

We continue our series of posts on step-by-step technical optimization of new WordPress websites for beginners and webmasters. This article will focus on creating and using Robots.txt file, Meta Robots tags and XML Sitemap.
Learn more about:
1. Robots.txt file: 'What is robots.txt'.
2. X-Robots-Tag: 'X-Robots-Tag in SEO Optimization'.
1. What Is Robots.txt and Why Is It Essential?
According to Google, a Robots.txt file is a file at the root of your website that indicates those parts of your website you don’t want accessed by search engine crawlers. This file contains directives describing access to sections of the website. For example, you can create separate access settings for mobile and desktop search robots.
In fact, this is a text file that can be edited in a usual notebook app.
1.1. Basic Requirements for Robots.txt File
It’s required for Robots.txt to:
- Be available at site.com/robots.txt;
- Not exceed 500 kilobytes;
1.2. Peculiarities of Robots.txt File
Keep in mind that:
- Robots.txt serves as guidance;
- Robots.txt settings do not affect links from other websites (you can close pages or files belonging only to your website);
- Robots.txt commands are case-sensitive.
Types of Robots.txt instructions to search robots:
- Partial access to certain parts of the website;
- Complete prohibition of scanning.
1.3. Cases of Using Robots.txt File
You can close unwanted pages from search robots and keep them from indexing using Robots.txt file. These may be:
- Pages with user's personal information;
- Pages with documentation and service information of the website which does not affect website interface display;
- Certain types of files, for example, PDF files;
- Admin panel, etc.
1.4. Creating Robots.txt File
The Robots.txt file can be created via any text editor. Its syntax includes three main elements:
By the way, sitemap can also be included in the file:
Robots.txt file is placed in the website root directory. If the domain of the website you are working on is the main one, the file will be located at /public_html/. If it’s additional – place it in the folder with the same name /site.com/. You need an FTP client (for example, Filezilla) and FTP access to put the file in the appropriate folder. It is given by the provider when you purchase hosting.
User-agent
The Allow and Disallow instructions are recognized by robots as a single entity and refer only to those search robots that were pointed in the first line. There are about 300 different search robots in total. If you want to apply the same rules to all search engine robots, then it is enough to put an asterisk (*) in the User-agent field. This symbol means any sequence of characters.
Disallow
Disallow command gives search crawlers recommendation on which parts of the website not to scan.
If Disallow field remains empty, it means that the entire website is open for scanning by robots. If you put Disallow: / in Robots.txt, it means that you close all website content from scanning.
If you need to close a specific folder from scanning, use Disallow: /folder.
You can hide a specific URL, file or a certain type of a file in the same way. For example, if you want to close all PDF files on your website, you have to write the following instruction in Robots.txt:
An asterisk before the file extension means any sequence of characters (any name), and the dollar sign at the end indicates that the index prohibition applies only to files ending with .pdf.
Full list of the URL blocking commands for Robots.txt file is written in details here.
Allow
Allow permits scanning of any file, directive, page. Let's say that it is necessary that robots can scan only pages starting with the word /other but cannot scan the rest of the content. In this case, the following combination should be written:
Allow and Disallow rules are sorted by the length of the URL prefix (from smallest to largest) and applied sequentially. If several rules apply to the page, robot selects the last rule in the sorted list. In our example, the following order would be obtained: robot would consider Disallow: / first, and then Allow: /other, so the /other folder would be indexed.
Read more → What is XML Sitemap
XML Sitemap
Sitemap contains addresses of all website URLs, that must be indexed by robots. It is usually located in the website root directory and has the following form: http://site.com/sitemap.xml. Sitemap is a file which helps a crawler to quickly detect changes in the list of existing URLs and appearance of new ones. Search engine robots will check this file every time they crawl the website.
You may have several different sitemaps depending on the content – for example, an additional sitemap for images or Google News Sitemap for content news projects.
You can use Netpeak Spider XML Sitemap Generator to create XML Sitemap.
To generate XML Sitemap and Image Sitemap in Netpeak Spider, you need to open the ‘Tools’ menu and select the corresponding option. Choose the sitemap you need in the opened panel, set all necessary parameters and generate sitemaps. If the size of your sitemap exceeds 5 MB, you can compress it into a .gz archive to save traffic.
Read more → Sitemap generator
After their creation, put one or both files in the website root directory and specify their address in Robots.txt file.
The instruction should be correctly entered in Robots.txt file:
If you need Google News Sitemap, you can use XML Sitemap & Google News feeds plugin. This plugin generates Sitemap and automatically places it in the website root directory.
1.5. Issues That May Occur in Robots.txt File:
- Wrong command order. There should be a clear logical sequence of instructions. First of all – User Agent, then Allow and Disallow. If you allow the entire website but disallow any separate parts or files, you should initially set Allow, and Disallow comes after that. If you disallow the entire website section but want to open some of its parts, priority should be for Disallow. It means that in this case, Disallow will stand above Allow.
- Several folders/directories are placed in one Allow or Disallow instruction. If you want to assign several different instructions to Allow and Disallow in Robots.txt, you should write each of them from a new line:
- Incorrect file name. The name should be only ‘Robots.txt’ and consist of lowercase Latin letters.
- Empty User-agent. If you want to set general instructions for all robots, use an asterisk.
- Syntax errors. If you mistakenly indicated any of the additional syntax elements in one of the instructions, robot can misinterpret them.
Read more → Wordpress meta tags
2. Creating and Using Meta Robots
Meta Robots tag allows you to define indexing and display settings in search results for each page. It should be placed in the <head> section of the page.
As we use website with WordPress CMS as an example, we can’t do this directly. You can use SEO plugin Yoast and its advanced settings to create basic Meta Robots for all search engine robots. Meta Tag Manager plugin can be used for advanced features, for example, to add any meta tags to all pages of your website. If you work with another CMS, you can easily find similar solution for your engine.
Meta Robots consists of two key attributes – name and content. The first one is responsible for choosing the search robot and the second one – for the instructions for it.
Such tag immediately reports to all search robots that this page does not need to be indexed and displayed in search results. But if we change the name, for example, to Googlebot, the instruction will only apply to Google's search robot.
If you need to specify instructions for several search robots, you can use several Meta Robots tags:
The tag indicates that Googlebot can’t index the website.
The tag indicates that the extended snippet for Google Newsreader is not to be displayed.
The entire list of possible directions used in Meta Robots can be found in the Google instructions for webmasters.
3. Spotting Issues
3.1. Checking Robots.txt File and Meta Robots
You can check settings of Robots.txt file instructions and Meta Robots tags by scanning your website with Netpeak Spider.
Note in the ‘Advanced’ crawling settings that you want to consider Robots.txt instructions and Meta Robots. Then select User-agent (Googlebot, for example). After that Netpeak Spider will crawl the file with all specified rules, just as the search robot does.
3.2. Checking XML Sitemap
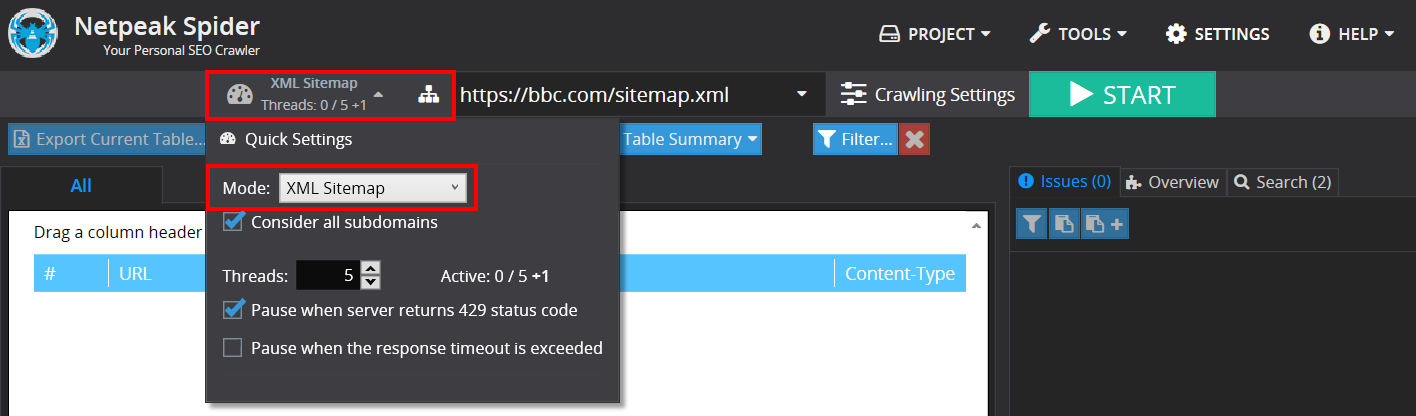
To check XML Sitemap, select the ‘XML Sitemap’ mode in the quick settings (to the left of the address bar). Checking is performed according to the validation schemes for the Sitemap files and Sitemap index files supported by Google, Bing, and Yahoo.
You can check XML Sitemap even in the free version of Netpeak Spider crawler that is not limited by the term of use and the number of analyzed URLs. Other basic features are also available in the Freemium version of the program.
To get access to free Netpeak Spider, you just need to sign up, download, and launch the program 😉
Sign Up and Download Freemium Version of Netpeak Spider
P.S. Right after signup, you'll also have the opportunity to try all paid functionality and then compare all our plans and pick the most suitable for you.
4. In a Nutshell
- Creating Robots.txt file and setting up Meta Robots tags is one of the key steps in technical optimization of your website. These instructions determine which parts of your website will be visible to search robots, and which ones will not.
- Checking Robots.txt file using Netpeak Spider is of primary importance: the slightest syntax error can close your website from scanning or open the access to unwanted files for robots.
- Do not underestimate the importance of the XML Sitemap. A correct, timely updated Sitemap will allow search engines to detect all changes in the list of existing URLs and appearance of new ones as quickly as possible.
In the next post we'll talk about the types of duplicates, canonical errors, and how to set up redirects. Stay tuned: we have so much for you to look forward to! And don’t hesitate to share your experience on creating Robots.txt files in comments below ;)