Local SEO Growth Hack For Guest Blogging And Outreach Link Building
How to

Many of you might remember the birth of Pigeon Algorithm in early 2014. Since then, Pigeon has been updated many times. There have been Ads integrations, a few design changes, as well as Google Maps integration. These changes are intended to bring better UX into the Google Search and to increase traffic for local businesses.
And while the local search features are progressing, we have discovered a way to improve your local link building. The key is in efficiently collecting the contacts and reaching out to the local editors and content writers. For this, we will use two Chrome extensions. Here's what you need to do.
1. Choose a Good Source
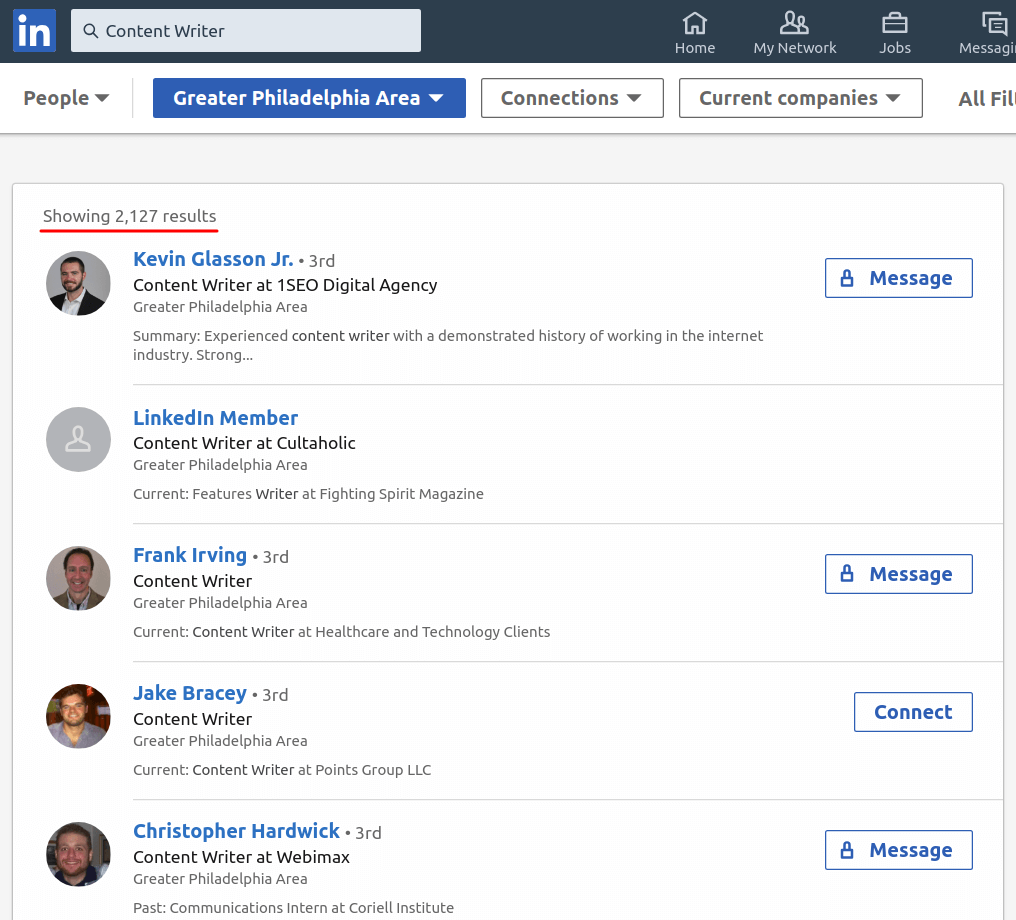
First, we'll need to use a major professional social network to find editors, content writers, or copywriters in our area. As an example, let's pick some content writers in Philadelphia.
2. Use an Extension
Look at the number of potential prospects – there are more than 2,000 people in our search! The next step is to collect their contacts. To do this, you can use two tools – email finder like Snov.io or LinkedIn Helper.
2.1. Email Finder
- Install an email addresses finder Chrome extension. Once you've signed in, get back to the page with Philadelphia content writers and click on the extension button.
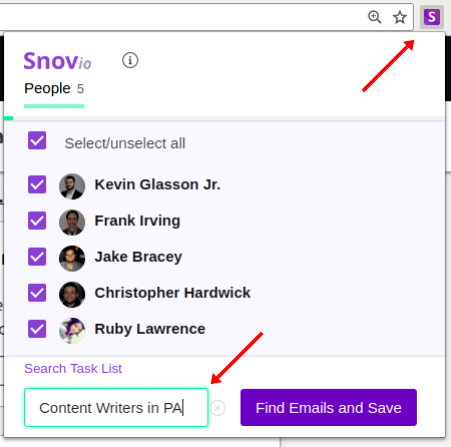
Now the extension will find the selected writers' emails on the page.
- Choose the list to add them to or create a new one.
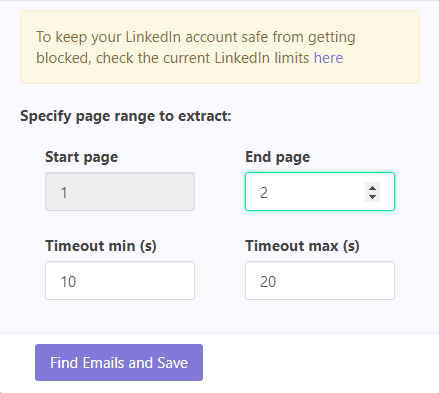
- Click the 'Find Emails and Save' button once and select the pages you want to collect the prospects from (the more pages you choose, the more prospects you get) and the timeout (to prevent your account from getting blocked for opening too many pages).
- Then click the 'Find Emails and Save' button a second time.
Once the search has been completed, you will receive a push notification.
- Click 'Go to List' to see the collected prospects. Usually, these profiles will have complete info on the prospect.
Don't worry if the emails don't show up right away – the search can take up to 30 minutes, depending on the number of emails. Once the emails are found, they will be automatically verified to get rid of abandoned or bouncy addresses. If you're uploading your own list, click the 'Verify current list' button to clean the list.
2.2. Linked Helper
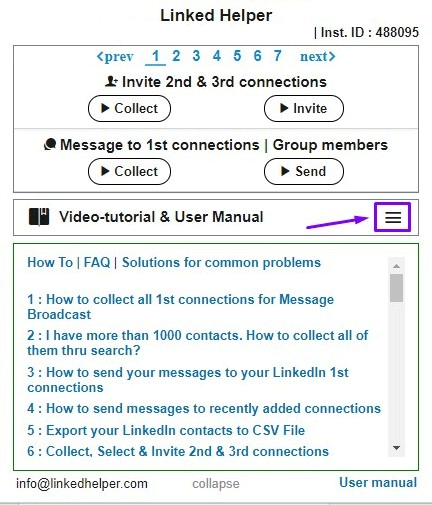
You may have noticed that collecting the 2nd and 3rd connections' emails is not that easy. Here's where the second tool comes to help. You will need LinkedIn Helper.
You can use it to contact your 2nd and 3rd connections through the tool or to collect their emails. Let's see how you can contact your local content creators through the tool.
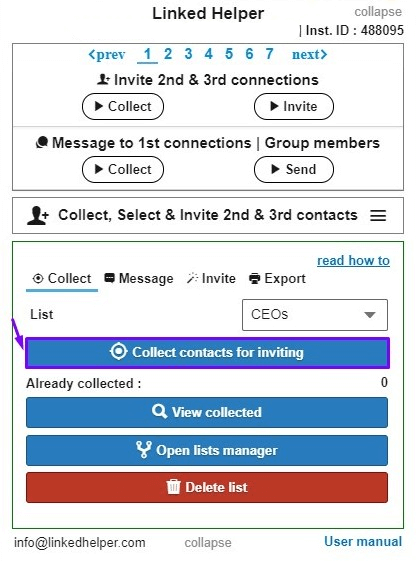
- This browser extension works with general LinkedIn profiles, Sales Navigator, and Recruiter Lite version. Once installed, go to our Philadelphia content writers page and click on the widget in the bottom right corner. In the menu, click the ☰ icon, and in the drop-down menu choose the 'Collect, select, and invite 2nd & 3rd contacts' option.
- Now, create a new list: in the drop-down menu next to 'List', select 'Create New'.
- Go to a search page and set search filters.
- Click the 'Collect Contacts for inviting' button. LinkedIn Helper will then go through all the search pages and add people to the inviting queue. Click the 'Stop collecting contacts' button if you want the search to stop. Click the 'View collected' button if you want to see people found for your list.

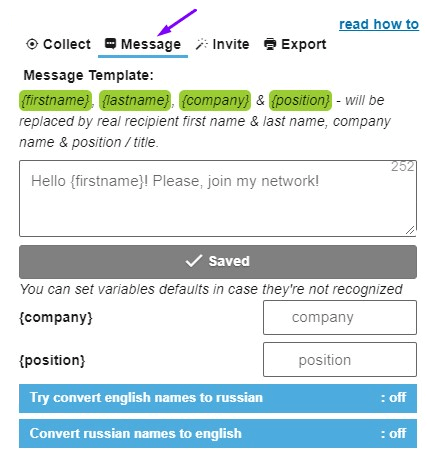
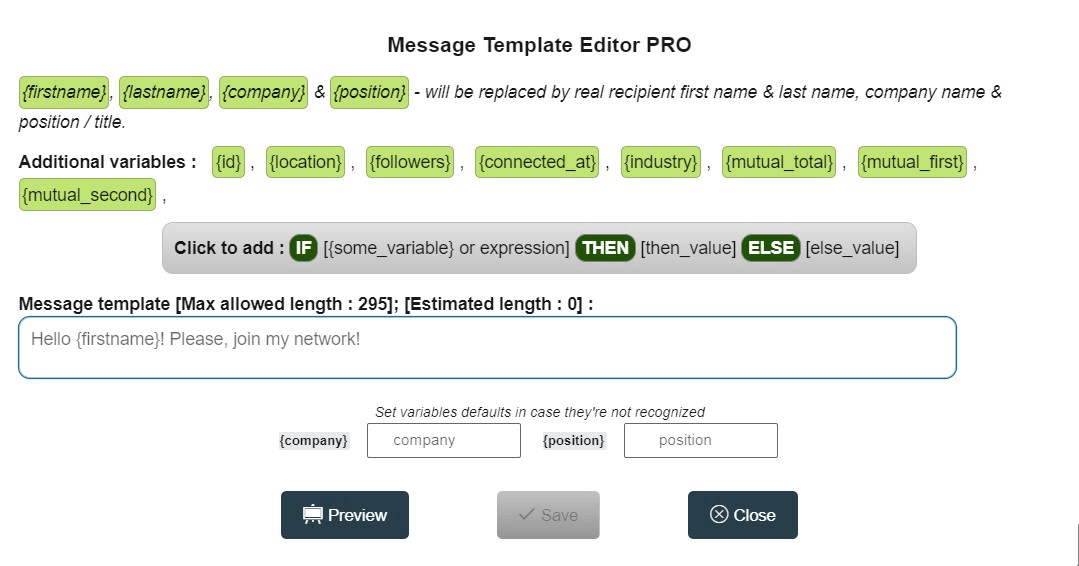
- Go to the 'Message' tab to create the message to send to the collected contacts. Your message can be personalized in the editor: there are variables {firstname}, {lastname}, {company}, and {position}, which will be replaced with real prospect data.You can also add conditions and options ([if], [then], [else]).
With the Helper you can also:
- exclude people from your list,
- see what every email looks like (with all variables replaced with actual data),
- edit messages before they are sent,
- set the delay for inviting (100 people per day is a limit),
- set timeout settings (time before actions to prevent your account from getting blocked).
Disclaimer. This extension was banned. Check out a guide on how to replicate your LinkedHelper processes in another service.
3. Using Email Addresses
3.1. Launching Drip Campaign
Probably one of the most tedious tasks in link building is creating personalized emails, sending them one by one as you find new leads and waiting hours, days, or sometimes weeks for a reply. All of this can be streamlined and automated. This growth hack lets you plan your emails once, and then watch them being sent out depending on the recipients' action. You just have to launch an email drip campaign.
You can create a flow as big as you need it to be: create follow-ups for those who have not replied, identify interested recipients, create emails with your offer for those who do reply, customize and personalize your messages to make them look as human as they can be. You launches it once and then don't have to worry about it for days. This lets you save time on research and emails, meaning it will also save you money. Scale this process as much as you need. If you're researching for email service to automate your work, check out the list of Top Email Marketing Services in 2019.
Here's how to create a drip campaign using Snov.io.
- First, go to your account's 'Campaigns' page and select a 'New drip campaign'.
- You will be taken to a drag-and-drop email campaign builder page, where, guess it, you can drag the elements and drop wherever you need to create a sequence. Here's what the builder page looks like:
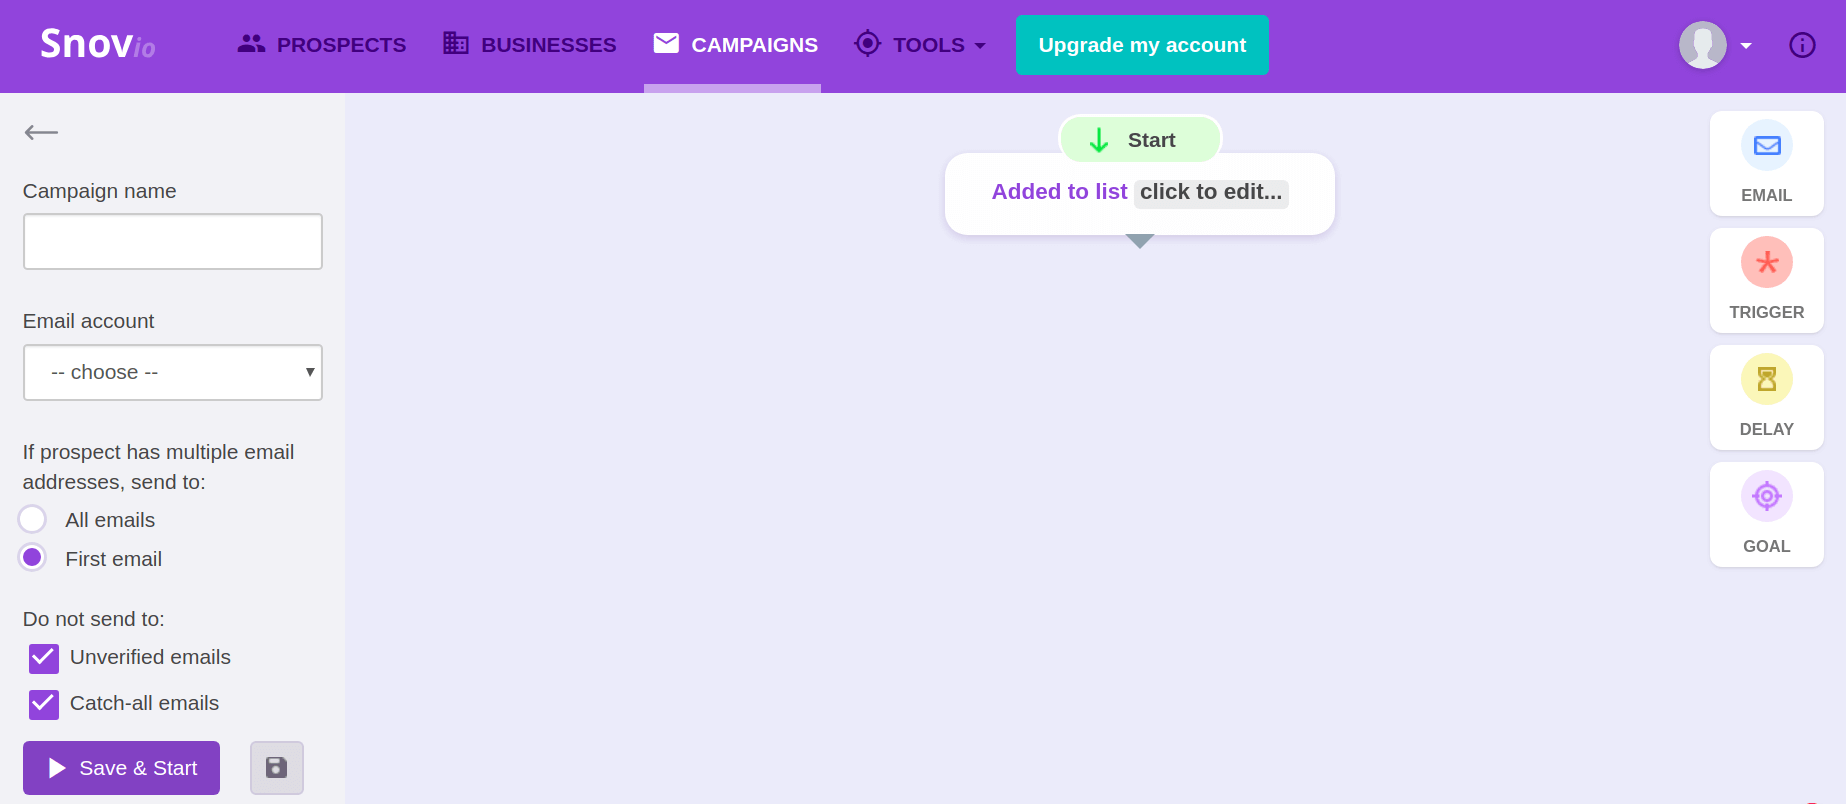
- Fill in the info on the left. Here you have to choose which email you will be sent from and a few other options for better deliverability and open rates. Don't forget to name your campaign.
- Next, click on the start element in the field. A tab will appear where you can choose the prospect list to send your campaign to. Ours was called Content Writers PA, so we'll choose that one.
- Now the fun part! On the right, you can see the elements of the campaign. These are your emails and the features that will make your campaign automated yet always relevant.
- To add an email to the chain, drag an 'Email' element into the field. Add personalization for better open and reply rates. Then, add a 'Trigger'. A 'Trigger' will define which email the recipient gets next – a follow-up if they have not opened the first email, an even more interesting email if they have opened the first one but haven't replied, or maybe the trigger will end the campaign for those who have replied so you can then discuss the offer in person. It's all up to you.
- If you don't want to seem too eager and have your follow-up sent immediately after the recipient opened the email, set a 'Delay'. Every chain must end in a 'Goal'. You can name your goals depending on the results, for example, 'Ready for a collaboration', 'Highly interested', 'Call for further discussion', etc. After reaching the goal, the emails will stop for your recipient.
- Don't forget to connect the elements to make the system work. Here's an example of a simple ready-to-start campaign.
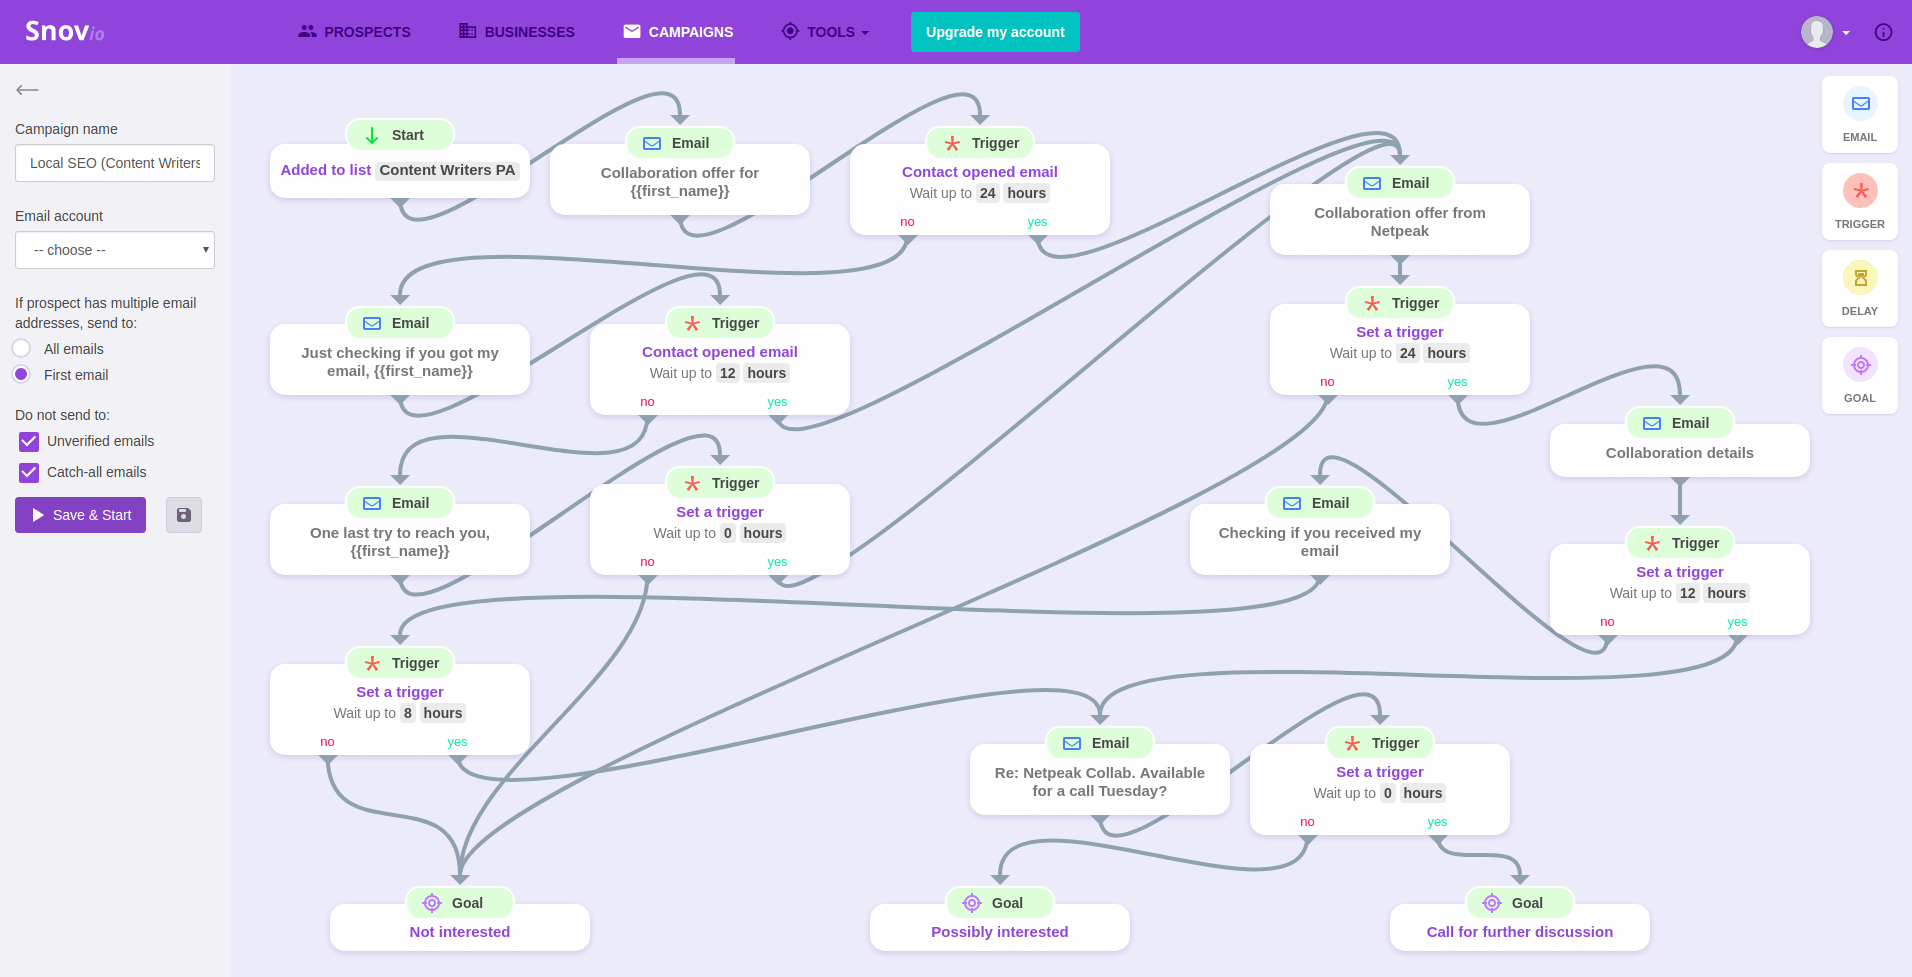
- Save and launch it once it's ready. You can follow the statistics for the campaign on your 'Campaigns' page and contact the recipients who have reached the 'Call for further discussion' goal.
3.2. Using Linked Helper
After you've collected the necessary prospects and created your message, your invitations can be sent. Simply click the 'Start profiles inviting' button in the 'Invite' tab.
Note: Don't switch to another tab, because the process will be frozen once the LinkedIn tab becomes inactive. You can open the page in a separate Chrome window to keep the system running.
You can always see people you've already invited in the 'Invited' tab, excluded people in the 'Excluded' tab, and the invites with errors in… you guessed it, the 'Processed with errors' tab.
To sum up
You can save tonnes of time and effort by automating the reaching out process.
Reach out to any professional within a certain location, send your offers, grow your guest blogging collaborators list, and improve your local link building by using two simple tools.
Give it a try and let us know in the comments just how much time this little growth hack saved you. Good luck!